User Guide/Workspace/Application and Setup Tree/Scripts: Difference between revisions
From STX Wiki
Jump to navigationJump to search
initial import |
|||
| (9 intermediate revisions by 3 users not shown) | |||
| Line 1: | Line 1: | ||
{{DISPLAYTITLE:{{SUBPAGENAME}}}} | {{DISPLAYTITLE:{{SUBPAGENAME}}}} | ||
{{UG ASTree}} | |||
The Scripts entry in the Application & Setup Tree is useful for those users who utilize the {{STX}} macro language. Here you can keep a list of your frequently used scripts. | |||
Each Script entry has it's own list of arguments. | |||
==Add or Edit Script== | |||
'''[[File:ws_as_script_add_edit.png]]''' | |||
;New Script:Create a new script on disk. | |||
;Select:Select a script file from disk. | |||
;Edit Script:Open the script for editing with the associated application for *.sts or *.stx files. If no association exists, the default system text editor is used. | |||
;Macro:Select the macro to call from those defined in the script file. | |||
;Arguments:The arguments to pass to the macro on execution. | |||
;Import from Script Controller:Import the settings from the Script Controller. | |||
;Export to Script Controller:Export the settings for this script to the Script Controller. | |||
;Debug:Execute the script in debug mode. | |||
;Run:Execute the script. | |||
For more information about script programming, see the {{STX}} Script [[Programmer Guide]]. | |||
==Setup dialog== | |||
[[File:ws_as_script_setup.png]] | |||
The general Script Settings dialog, accessed via the 'Scripts' entry in the {{ASTree}} lets you specify what action should taken when a script entry is double-clicked. | |||
;Double-click:Choose what action should be carried out on a script, when it is double-clicked. | |||
;Reset Defaults:Return the Scripts leaf of the Application & Setup Tree to it's default state (i.e. when it was {{STX}} was first installed). | |||
;OK / Cancel:Save (OK) or cancel any changes. Note that if you have chosen Reset Defaults, you cannot cancel. | |||
==Context Menu== | |||
;Run:Run the selected script. | |||
;Copy:Copy the selected script entry (Note that the script itself is not copied). | |||
;Rename:Rename the script entry. | |||
;Delete:Delete the script entry. | |||
;Edit:Edit the script in the associated editor. | |||
;Add:Add a new script entry. | |||
;Test:Test the script. | |||
;Settings:Open the script entry [[User Guide/Workspace/Add/Edit Script|settings dialog]]. | |||
;Debug:Run the script in the debugger. | |||
Latest revision as of 12:10, 12 September 2019
| The STx Workspace: The Application & Setup Tree |
|---|
The Scripts entry in the Application & Setup Tree is useful for those users who utilize the STx macro language. Here you can keep a list of your frequently used scripts.
Each Script entry has it's own list of arguments.
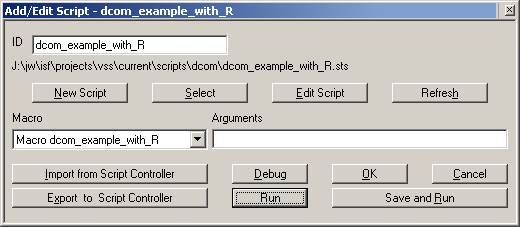
Add or Edit Script
- New Script
- Create a new script on disk.
- Select
- Select a script file from disk.
- Edit Script
- Open the script for editing with the associated application for *.sts or *.stx files. If no association exists, the default system text editor is used.
- Macro
- Select the macro to call from those defined in the script file.
- Arguments
- The arguments to pass to the macro on execution.
- Import from Script Controller
- Import the settings from the Script Controller.
- Export to Script Controller
- Export the settings for this script to the Script Controller.
- Debug
- Execute the script in debug mode.
- Run
- Execute the script.
For more information about script programming, see the STx Script Programmer Guide.
Setup dialog
The general Script Settings dialog, accessed via the 'Scripts' entry in the Application & Setup Tree lets you specify what action should taken when a script entry is double-clicked.
- Double-click
- Choose what action should be carried out on a script, when it is double-clicked.
- Reset Defaults
- Return the Scripts leaf of the Application & Setup Tree to it's default state (i.e. when it was STx was first installed).
- OK / Cancel
- Save (OK) or cancel any changes. Note that if you have chosen Reset Defaults, you cannot cancel.
Context Menu
- Run
- Run the selected script.
- Copy
- Copy the selected script entry (Note that the script itself is not copied).
- Rename
- Rename the script entry.
- Delete
- Delete the script entry.
- Edit
- Edit the script in the associated editor.
- Add
- Add a new script entry.
- Test
- Test the script.
- Settings
- Open the script entry settings dialog.
- Debug
- Run the script in the debugger.

